This post may contain affiliate links which means I may receive a commission for purchases made through links.
An orange peel is one of the many potential car paint issues you’re likely to encounter after applying a fresh coat of paint to your car. This gives your car paint finish a textured, inconsistent appearance instead of a smooth and sleek finish, which can be very frustrating.
In addition, the orange peel creates a bumpy, uneven surface that becomes particularly prominent when light shines on the car. On the bright side, like any other car paint problem, the orange peel effect is relatively easy to avoid and fix.
In this article, I’ll show you how to avoid orange peel when painting a car, and how you can fix it if it occurs!
What is Orange peel?
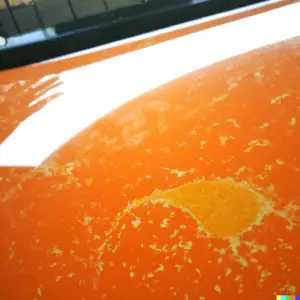
In car paint, an orange peel refers to the dimpled, bumpy appearance resembling the surface of an orange or citrus fruit that forms on the car paint after application.
This results in a textured, inconsistent appearance as opposed to a nice smooth finish, making your paint job look unpleasant. In addition, an orange peel consists of dimples and slight waves that reflect light in various directions.
What causes an orange peel?
The air within the spray gun propels the car paint on the car’s surface, where it spreads out into a thin, uniform layer. However, that is not always the case. Sometimes, the paint fails to set evenly, forming a textured surface that resembles an orange peel.
Generally speaking, an orange peel is caused by an inadequate breakup of paint particles when spraying your coating. The process when paint particles break up into small droplets when spraying paint is known as atomization.
More importantly, the smoothness of the paint finish depends on how small the paint droplets are. However, if the paint is not broken into small enough particles, the paint finish will have an orange peel, resulting in an unwanted chunky finish.
Several factors can cause the orange peel effect to happen on your paint job. The main ones are;
Spray Gun Settings (Spraying PSI)
Although an orange peel effect mainly occurs due to human error, not having the right equipment for the paint job can also be a major contributor.
This includes using the wrong spray technology for the thickness and viscosity of the coating you want or an incorrect spray gun setup with low air pressure, incorrect flow rate, or wrong nozzle.
All these factors will prevent the coating from being properly atomized, causing the finish to have the dreaded orange peel effect.
Therefore, it’s important to set your spray gun at the right PSI, gun flow, and other gun settings when painting your car. Specifically, the spray gun should be set at a pressure output of between 26 and 30 PSI when spraying enamel, base coat, and clear coat.
Ambient temperature
The ambient temperature of the room you’re working in is another factor that can cause an orange peel to form since it influences the temperature of the panel.
The mixture of the car paint material
Paint preparation involves mixing the car paint with various components like a reducer or hardener and clear coat activator. When applying single-stage enamel, you should ensure that you’re using the right additives when working in certain temperatures.
Other factors that can cause an orange peel to form on your car paint include;
- Applying too much paint at once
- Premature evaporation of the car paint thinner
- Painting in a room that is too hot
- Spraying the car paint at the wrong angle
- Applying improperly mixed paint
- Improper spray gun settings, resulting in less air
How to avoid the orange peel effect on car paint
The key to avoiding the orange peel effect when painting your car is ensuring the paint droplets are smaller enough through better atomization to achieve a smoother paint finish. Now, there are 3 primary ways you can use to achieve better atomization. That is;
Increase the amount of air in a specific amount of auto paint
One way to create smaller paint particles is to increase the pressure and amount of air you’re injecting in a certain amount of paint. This can either be accomplished by increasing the air pressure or reducing the amount of paint you’re spraying at a given time.
In return, this allows the paint to break into smaller particles, helping to stop the orange peel.
If you’re using a siphon feed or gravity spray gun, you can create smaller paint particles by increasing the air pressure, turning in the fluid needed, or using a smaller tip.
And for a pressure-fed paint sprayer, reduce the pot fluid pressure first before you consider the tips mentioned above for a siphon feed/ gravity spray gun.
In addition, you may want to change the air caps on your equipment. For instance, conventional air caps offer the highest volume of air and pressure, thus allowing the easiest atomization of any coating.
Evaluate your equipment choice
Car paint manufacturers offer technical data sheets for all types of paints that contain the recommended paint equipment for a particular project. You should always consider using the recommended type of equipment suggested by the manufacturer in this datasheet.
Moreover, some manufacturers even recommended multiple types of equipment as potential options. If that’s the case, choose an air spray gun over an airless sprayer as it provides the highest level of car paint finish.
Other factors regarding the equipment worth considering are; equipment settings, air cap & fluid nozzle on the spray gun, and tip size of the airless sprayer. If you still insist on using an airless sprayer, make sure you increase the pressure while spraying to prevent the orange peel.
Thin your car paint
As I mentioned above, the easiest way to avoid orange peel when painting your car is to create smaller/ fine paint particles. Apart from increasing air in a specific amount of paint, you can also accomplish this by thinning the paint.
Thinning makes the car paint easier to break and creates a finer finish, which helps to prevent the unwanted orange peel texture.
Typically, a paint sprayer requires paint to be mixed or thinned to allow the sprayer to work properly and help the paint flow easily through the equipment. To accomplish this, add the right reducer to the paint you’re spraying. However, avoid adding too much reducer as it may cause the paint to run.
How to fix orange peel on car paint
If an orange peel has already formed on your car’s paint job, don’t worry! In this section, I’ll show you how to get rid of the orange peel to make the unsightly appearance of your paint job go away.
First, here are some of the items you’ll need for the task;
- Paint thinner
- Cotton swab
- 2000-grit sandpaper
- Rubbing compound
Next, follow the steps below to fix the orange peel on your car paint:
Step 1
Once you notice that orange peel is forming on your car’s surface while spraying car paint, stop painting immediately and allow the surface to dry fully.
Step 2
Once the surface has dried completely, wrap a sanding block with 2000-grit sandpaper, slowly dip the sanding block into water and spray the area to be wet sanded. Start to sand the surface in even strokes using light pressure, restricting yourself to an area of about 12 X 12”.
Make sure the body panel and surface are wet at all times to avoid scratching the car paint. Sand the orange peel blotches until you remove the existing orange peel as you prepare to reapply the paint.
If the 2000-grit isn’t cutting through the orange peel, consider moving down to coarser grit sandpaper of 1500 or 1000. However, don’t use any sanding paper coarser than 1000 grit on car paint.
Afterward, finish off the surface using 2000-grit sandpaper to eliminate any scratches left by a heavier grit.
Step 3
As mentioned earlier, an orange peel will occur if the paint is not flowing at an optimum rate. So, check if the nozzle has any globs of paint/ debris. Dip a cotton swab in paint thinner and use it to remove any obstructions on the paint sprayer’s nozzle.
Step 4
After removing the obstruction on the nozzle, test the paint sprayer on a piece of metal, keeping the nozzle at least 1 ft from the surface. Holding the nozzle too far or too close to the surface prevents the paint from misting properly, causing the orange peel effect.
Step 5
Add some paint thinner to the spray gun to dilute the car paint if the paint still produces an orange peel on the piece of the metal surface. Test the sprayer again to see if the issue has been corrected before you start painting the car.
Step 6
If you’re still having issues with orange peel after fixing the problems above, reduce the temperature of your workspace. Intense heat causes the paint to dry prematurely, leading to the orange peel effect. The ideal temperature for painting a car should be below 70 degrees F.
Step 7
After applying the new coat of paint and allowing it to dry, apply a rubbing compound over the paint to give it a shiny appearance and flatten it out the paint.
Work in a circular motion while applying the rubbing compound, keeping the buffer moving at all times. Continue buffing the car paint with the rubbing compound until you get the desired results.
Step 8
Lastly, apply a new coat of car wax since buffing and sanding will remove any wax protection that your car might have had. However, avoid applying car wax if the paint has not completely hardened yet!
Conclusion
Bumpy car paint that looks like an orange peel can happen when using a paint spray gun. This usually indicates that the paint particles are too large, causing your car to have an uneven, chunky finish.
Therefore, to avoid the orange peel effect on car paint, you need to reduce the size of the car paint particles. Thankfully, the tips we’ve mentioned above will help you prevent and fix the orange effect when it happens on your car paint.
Read Next: 8 car paint problems and how to fix them.
Leave a Reply