This post may contain affiliate links which means I may receive a commission for purchases made through links.

If you look at your car paint closely under street paint or under the sun, you’ll see swirls or scratches that are invisible to the naked eye, making your vehicle look dull and old. You’re not alone though!
According to research, over 99% of the cars you see on the road suffer from swirls, scratches, oxidation, dullness, and other surface imperfections.
Unfortunately, apart from making your car look unprofessional, these car paint problems will affect your vehicle’s resale value. So, if you’re hoping to restore your pride of ownership or boost the car’s resale value, you have to make the exterior look better.
This is where car paint correction comes in! But what exactly is paint correction? How long does it take? What are the stages of car paint correction?
Relax! If those are some of the questions in your mind, you’re in the right place! So, just read on to learn everything you need to know about car paint correction!
What is car paint correction?
Paint correction refers to a multistep process in an auto detailing procedure that involves removing swirl marks, minor scratches, hazing, marring, and other blemishes from the car’s clear coat.
In other words, car paint correction is the process of diminishing or removing surface imperfections from the car’s exterior finish to restore the original look and shine of its paintwork.
Moreover, this process entails using specialized techniques, tools, and polishing compounds to get rid of these surface imperfections.
It’s also worth mentioning that car paint correction is not the same as polishing or waxing. While polishing and waxing will leave you with a good finish, they do not remove any of the surface defects like oxidation, swirl marks, or scratches.
On the other hand, paint correction is a more in-depth process that improves the condition of your car’s finish and appearance to achieve a showroom-quality finish.
Importance of car paint correction
First of all, paint correction is an important aspect of restoring your vehicle’s paintwork. But what makes it so important?
To start, paint correction helps to get rid of minor scratches and swirl marks. At the same time, it removes other surface imperfections like corroded water spots, bird droppings, bonded tree sap, oxidation, and bug splatter corrosion.
Another importance of paint correction is that it protects the car’s underlying layers from damage caused by airborne debris and UV rays. For instance, waxing, which is a crucial part of paint correction, provides an extra layer of protection from harsh environmental elements that can damage the car paint.
In addition, removing any imperfections in the car’s exterior will significantly increase the overall lifespan of your vehicle’s paintwork. Even better, paint correction will boost your car’s resale value if you ever decide to resell it to upgrade to another vehicle.
Lastly, many cars need paint correction before you apply a paint protectant like ceramic coating. Skipping this process will prevent the coating from adhering properly to the car.
Not to forget that any damage to the car’s paintwork will be visible through the ceramic coating.
Car paint defects
Before you dive into the car paint correction process, make sure you identify the specific car paint defect affecting your car.
In that regard, the most common car paint defects include:
- Scratches. Both deep and shallow scratches can mar your vehicle’s finish. These surface imperfections are usually caused by abrasive materials, accidental contact with foreign objects, and improper washing techniques.
- Swirl marks. As the name implies, swirl marks refer to circular scratches that appear on the car’s finish, significantly reducing the gloss and depth of your paint job. These marks usually occur due to improper car drying or washing techniques.
- Water spots. Water spots form on your car surface when water droplets evaporate and leave behind mineral deposits that etch into the car paint.
- Oxidation. This paint defect occurs when the top layer of your car’s exterior is damaged by exposure to environmental factors like UV rays, resulting in a dull, chalky appearance.
- Holograms. These are a series of wavy, overlapping lines on the car paint surface due to improper polishing techniques.
Tools and Compounds Used in Car Paint Correction
To achieve professional results, you will need the following tools and compounds for car paint correction:
Dual-action polisher/Rotary buffer
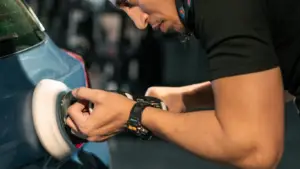
A rotary buffer or dual-action polisher is an important tool for car paint correction. The machines use a combination of oscillation and rotation motions to polish the car’s finish, restoring its shine while getting rid of surface defects.
Specifically, the machines cut into the car’s clear coat, leaving it looking smooth, while increasing the paint’s lifespan.
Foam/polishing pads
A polishing pad is an attachment that is installed on the machine polisher to eliminate scratches, swirls, and stains on the car’s surface. More importantly, these pads come in different sizes and are made from various materials like wool, microfiber, and foam.
Microfiber pads can cut through harder ceramic coats, while foam pads are easier to work with and ideal for casual use. Contrarily, wool pads produce less heat and deliver better results on sticky car paint.
Clay bar, car wash soap, and lubricant
Before you start the paint correction process, you will need to wash the car surface with a clay bar, lubricant, and car wash soap to ensure the paintwork is clean and free of contaminants.
Moreover, washing and decontaminating the car paint will provide a smooth surface for the paint correction process.
Paint correction polish or compound
A paint correction polish is formulated to restore the car to its original color and remove the marks and light scratches left by compounds.
On the other hand, compounds are designed for removing etching and heavy scratches as they’re more aggressive.
Microfiber towels
A microfiber towel is ideal for buffing your car’s finish and removing polish residue. Moreover, they ensure a flawless result since their ultra-soft fibers do not scratch the car paint.
Car paint sealant
Finally, you will need a car paint sealant to protect the car paint from harsh environmental elements like acidic rain, excessive heat, and UV rays.
How to do car Paint Correction: Step-by-Step
Step 1: Car Surface preparation and initial assessment
To ensure a successful paint correction the first step you need to take is surface preparation. This step will play a crucial role in ensuring the quality of your paint correction and help you achieve the desired outcome.
To start, thoroughly wash your car with the best car wash shampoo/ soap to remove dust, grime, and dust. Also, make sure you use a clean microfiber cloth and the 2-bucket method to reduce the risk of scratching the paint during the car wash process.
After washing the car, use a lubricant and clay bar to get rid of the remaining surface contaminants. This step will ensure that the car surface is clean, smooth, and ready for the paint correction process.
Step 2: Choose the right paint correction polish and compound
Microfiber and foam pads have different levels of aggressiveness, ranging from cutting to finishing.
Finishing pads are intended for refinishing and polishing the paint surface as they’re less aggressive while cutting pads are ideal for removing deeper paint defects as they’re more aggressive.
Now that you have a basic understanding of the different types of paint correction pads available and their uses, the next step is to choose the appropriate polish or compound for your project.
In essence, the ideal polish or compound will depend on the severity of the paint defects you want to address.
For instance, you can use a finer polish to remedy lighter defects and a more aggressive compound to work on heavier defects.
Step 3: Machine polishing and correction
You can use 2 machine options when doing car paint correction depending on the severity of the paint defect; a rotary buffer or a dual-action polisher.
A rotary machine is ideal for handling substantial effects like swirl marks and deep scratches, while a dual-action polisher is notable for dealing with mild to moderate surface defects.
Before using your rotary buffer or dual-action polisher, wear the appropriate safety gear like eye protection and gloves. Also, make sure you keep the power cord of the machine polisher over your shoulder to prevent it from coming into contact with the car or polisher.
After observing the safety precautions above, hold the machine polisher firmly with both hands over the car surface, while applying uniform pressure to the pad.
Work in small sections of about 2 by 2 ft to ensure uniform coverage and maintain control. Spend about 30 seconds to 1 minute in every section as you make overlapping passes to get a smooth and glossy surface.
Once you’re done polishing a section, gently wipe any residue with a clean microfiber towel and inspect the area to see if you have achieved the desired level of correction.
If necessary, repair the machine polishing process until you get the desired results.
Step 4: Paint protection
After completing the car paint correction process, the next step is to protect the car’s finish with a high-quality car wax or paint sealant to provide a barrier against future damage. Also, you should avoid using abrasive materials or chemicals when washing your car and maintain a regular washing routine.
Stages of Car Paint Correction
There are 3 different stages of paint correction depending on the severity of your car’s paint damage. More notably, each stage uses a different combination of cutting compounds and buffing pads.
Nonetheless, each stage starts with a clay bar treatment and thorough hand washing to remove debris from your car’s paint job.
With that in mind, here are 3 common stages of car paint correction:
Stage 1 Correction
This stage is for fixing minor cosmetic damage to the car’s paintwork and only requires a finishing compound and finishing pad. The purpose of this stage is to correct paint defects and refine paint jobs.
Interestingly, this level of paint correction can fix up to 70% of car paint imperfections.
Stage 2 Correction
This level of paint correction is recommended for moderate damage as it rectifies most scratches and swirl marks. However, this stage requires 2 different pads and compounds that are abrasive enough to make a significant cut into the car’s clear coat layer.
All in all, this level of correction can fix up to 90% of car paint imperfections.
Stage 3 Correction
Stage 3 correction is used for cars with incredibly deep scratches or heavy swirl marks. Unlike other levels of paint correction, this stage starts with wet sanding the car surface with different sandpaper grades to smooth out the car finish.
As a result, this process will take more time than stage 1 and 2 corrections. However, it’s the only way to fix clear coats with significant defects.
Once you’re done evening out the clear coat with the wet sanding process, the next step is to perform a stage 2 correction to restore the paint job’s sheen.
How long does it take to perform paint correction?
Professional detailers take their time while performing car paint corrections to ensure that the process is done right. Besides, rushing through the job may provide unsatisfactory results.
In most cases, car paint correction takes about 5 hours for a simple one-stage level of correction, while a more in-depth multi-step process can take up to 30 hours.
Conclusion
If your car has some noticeable marks that are affecting its overall look or making it look a little lackluster, you may want to consider getting a paint correction. This process can be incredibly rewarding as it will restore your car’s finish to the showroom shine.
Plus, it will boost your car’s resale value yet it’s relatively easy to do, provided you have the right tools and techniques.


Leave a Reply